How to Deploy a Next.js Application using Docker on AWS: A Comprehensive Guide
Next.js is a popular React framework for building server-side rendered (SSR) applications that offers a number of benefits such as automatic code splitting, optimized page rendering, and easy deployment.
Docker, on the other hand, is a popular tool for packaging and deploying applications in containers.
By combining the power of Next.js and Docker, we can easily host and scale our application in the cloud. In this article, we will explore how to deploy a Next.js application with Docker on AWS, step-by-step.
Create the project
Create the CDK project
This tutorial will use the CDK to create AWS infrastructure as code.
Let's start with creating the CDK project:
mkdir nextjs-hosting-docker-aws
cd nextjs-hosting-docker-aws
npx aws-cdk init app --language=typescript
Create the Next.js project
We'll create the Next.js project within the infrastructure directory:
npx create-next-app@latest --ts
We'll name the Next.js project webapp and accept the default configuration.
To make sure server side rendering (SSR) and environment variables are working correctly, we'll add server side props to `index.tsx':
import styles from "@/styles/Home.module.css";
import Head from "next/head";
import Image from "next/image";
interface HomeProps {
day:
| "Sunday"
| "Monday"
| "Tuesday"
| "Wednesday"
| "Thursday"
| "Friday"
| "Saturday";
hours: number;
minutes: number;
imageUrl: string;
}
export default function Home({ day, hours, minutes, imageUrl }: HomeProps) {
return (
<>
<Head>
<title>Hosting a NextJs app on AWS App Runner</title>
<meta name="description" content="Generated by create next app" />
<meta name="viewport" content="width=device-width, initial-scale=1" />
<link rel="icon" href="/favicon.ico" />
</Head>
<main className={styles.main}>
<p>Today is {day}</p>
<p>
It's {hours}:
{minutes.toLocaleString("en-US", {
minimumIntegerDigits: 2,
})}
</p>
<Image src={imageUrl} alt="a random image" width={500} height={500} />
</main>
</>
);
}
export async function getServerSideProps() {
const days = [
"Sunday",
"Monday",
"Tuesday",
"Wednesday",
"Thursday",
"Friday",
"Saturday",
];
const today = new Date();
const day = days[today.getDay()];
const hours = today.getHours();
const minutes = today.getMinutes();
console.log({ url: process.env.RANDOM_IMAGE_API_URL });
const response = await fetch(process.env.RANDOM_IMAGE_API_URL!);
const { url } = response;
return { props: { day, hours, minutes, imageUrl: url } };
}
In order to display the image, we need to add the following configuration to next.config.js:
const nextConfig = {
  ...
  images: {
    remotePatterns: [
      {
        protocol: "https",
        hostname: "images.unsplash.com",
      },
    ],
  },
};

module.exports = nextConfig;
With this code in place, the Next.js application server side renders:
- today's day
- the current time
- a random image (whose url is provided by the RANDOM_IMAGE_API_URL environment variable)
Containerize the Next.js application
We'll use Docker to containerize the Next.js application.
Vercel provides a Dockerfile, so we can just copy it in the Next.js directory.
FROM node:18-alpine AS base
# Install dependencies only when needed
FROM base AS deps
# Check https://github.com/nodejs/docker-node/tree/b4117f9333da4138b03a546ec926ef50a31506c3#nodealpine to understand why libc6-compat might be needed.
RUN apk add --no-cache libc6-compat
WORKDIR /app
# Install dependencies based on the preferred package manager
COPY package.json yarn.lock* package-lock.json* pnpm-lock.yaml* ./
RUN \
if [ -f yarn.lock ]; then yarn --frozen-lockfile; \
elif [ -f package-lock.json ]; then npm ci; \
elif [ -f pnpm-lock.yaml ]; then yarn global add pnpm && pnpm i --frozen-lockfile; \
else echo "Lockfile not found." && exit 1; \
fi
# Rebuild the source code only when needed
FROM base AS builder
WORKDIR /app
COPY /app/node_modules ./node_modules
COPY . .
# Next.js collects completely anonymous telemetry data about general usage.
# Learn more here: https://nextjs.org/telemetry
# Uncomment the following line in case you want to disable telemetry during the build.
# ENV NEXT_TELEMETRY_DISABLED 1
RUN yarn build
# If using npm comment out above and use below instead
# RUN npm run build
# Production image, copy all the files and run next
FROM base AS runner
WORKDIR /app
ENV NODE_ENV production
# Uncomment the following line in case you want to disable telemetry during runtime.
# ENV NEXT_TELEMETRY_DISABLED 1
RUN addgroup --system --gid 1001 nodejs
RUN adduser --system --uid 1001 nextjs
COPY /app/public ./public
# Automatically leverage output traces to reduce image size
# https://nextjs.org/docs/advanced-features/output-file-tracing
COPY /app/.next/standalone ./
COPY /app/.next/static ./.next/static
USER nextjs
EXPOSE 3000
ENV PORT 3000
CMD ["node", "server.js"]
In order to get this to work, we need to add the following configuration to next.config.js:
const nextConfig = {
    ...
    output: "standalone",
    ...
  },
};

module.exports = nextConfig;
Push the Docker image to ECR
Back to the infrastructure code, since we're going to implement different options to deploy to AWS, let's first delete the default stack and create a new one:
import * as cdk from "aws-cdk-lib";
import * as ecrAssets from "aws-cdk-lib/aws-ecr-assets";
import { Construct } from "constructs";

export class NextjsHostingDockerAppRunnerStack extends cdk.Stack {
  constructor(scope: Construct, id: string, props?: cdk.StackProps) {
    super(scope, id, props);

    const imageAsset = new ecrAssets.DockerImageAsset(this, "Image", {
      directory: "./webapp",
    });
    }
}
This will push the Docker image to ECR.
Deploy the Next.js application to AWS
Option 1: App Runner
The first option to deploy the containerized Next.js application to AWS is to use App Runner.
AWS App Runner is a fully managed service that makes it easy to build, deploy, and run containerized applications.
The simplest way to deploy to use App Runner is to use the alpha L2 construct.
npm install @aws-cdk/aws-apprunner-alpha
import * as apprunner_alpha from "@aws-cdk/aws-apprunner-alpha";
import * as cdk from "aws-cdk-lib";
import * as ecrAssets from "aws-cdk-lib/aws-ecr-assets";
import { Construct } from "constructs";

export class NextjsHostingDockerAppRunnerStack extends cdk.Stack {
  constructor(scope: Construct, id: string, props?: cdk.StackProps) {
    super(scope, id, props);

    const imageAsset = new ecrAssets.DockerImageAsset(this, "Image", {
      directory: "./webapp",
    });

    const service = new apprunner_alpha.Service(this, "NextJsService", {
      source: apprunner_alpha.Source.fromAsset({
        asset: imageAsset,
      }),
      cpu: apprunner_alpha.Cpu.ONE_VCPU,
      memory: apprunner_alpha.Memory.TWO_GB,
    });
    service.addEnvironmentVariable(
      "RANDOM_IMAGE_API_URL",
      "https://random.imagecdn.app/500/500"
    );

    new cdk.CfnOutput(this, "ServiceUrl", { value: service.serviceUrl });
  }
}
After the image is pushed to ECR, we can use it as a source for the App Runner service.
Let's deploy the stack:
npx aws-cdk deploy
Once the stack is deployed, we can go to the url indicated by the output ServiceUrl, and make sure the application is working.
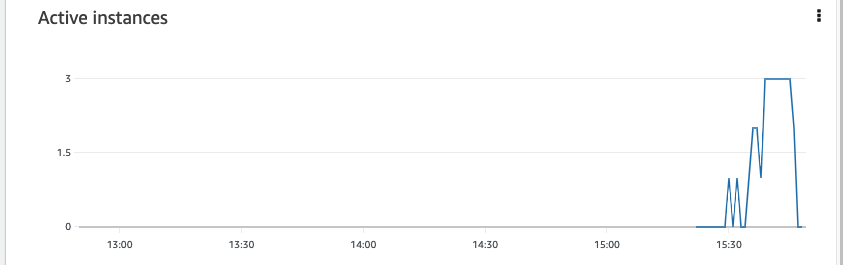
Let's load the service with hey, and send 200 requests for 3 minutes:
hey -c 200 -z 3m https://xxxxxxxxxx.region.awsapprunner.com/
From the metrics console, we can see that App Runner automatically scales to 3 active instances to accomodate the load, and then scales down to 0 active instances when there is no more requests.
Option 2: App Runner with Auto Scaling Configuration
If we want to using a different Auto Scaling configuration, we have to use the App Runner L1 construct []CfnService](https://docs.aws.amazon.com/cdk/api/v2/docs/aws-cdk-lib.aws_apprunner.CfnService.html).
In addition, at the time of this writing, there is no construct to set a custom Auto Scaling configuration. Luckily, we can use the cdk-apprunner-autoscaling package to help us with that:
npm install cdk-apprunner-autoscaling
Let's create another stack to use this solution:
import * as cdk from "aws-cdk-lib";
import * as apprunner from "aws-cdk-lib/aws-apprunner";
import * as ecrAssets from "aws-cdk-lib/aws-ecr-assets";
import * as iam from "aws-cdk-lib/aws-iam";
import { AppRunnerAutoScaling } from "cdk-apprunner-autoscaling";
import { Construct } from "constructs";

export class NextjsHostingDockerAppRunnerAutoScalingStack extends cdk.Stack {
  constructor(scope: Construct, id: string, props?: cdk.StackProps) {
    super(scope, id, props);

    const imageAsset = new ecrAssets.DockerImageAsset(this, "Image", {
      directory: "./webapp",
    });

    // create the Auto Scaling Configuration
    const autoScalingConfiguration = new AppRunnerAutoScaling(
      this,
      "AutoScalingConfiguration",
      {
        AutoScalingConfigurationName: `demo`,
        MaxConcurrency: 50,
        MinSize: 1,
        MaxSize: 1,
      }
    );

    // create the access role to pull the image from ECR
    const accessRole = new iam.Role(this, "AccessRole", {
      assumedBy: new iam.ServicePrincipal("build.apprunner.amazonaws.com"),
    });
    accessRole.addToPrincipalPolicy(
      new iam.PolicyStatement({
        actions: ["ecr:GetAuthorizationToken"],
        resources: ["*"],
      })
    );
    imageAsset.repository.grantPull(accessRole);

    // create the App Runner service
    const service = new apprunner.CfnService(this, "WebApp", {
      autoScalingConfigurationArn: autoScalingConfiguration.arn,
      instanceConfiguration: {
        cpu: "1 vCPU",
        memory: "2 GB",
      },
      sourceConfiguration: {
        authenticationConfiguration: {
          accessRoleArn: accessRole.roleArn,
        },
        autoDeploymentsEnabled: true,
        imageRepository: {
          imageRepositoryType: "ECR",
          imageIdentifier: imageAsset.imageUri,
          imageConfiguration: {
            runtimeEnvironmentVariables: [
              {
                name: "RANDOM_IMAGE_API_URL",
                value: "https://random.imagecdn.app/500/500",
              },
            ],
          },
        },
      },
      networkConfiguration: {
        egressConfiguration: {
          egressType: "DEFAULT",
        },
      },
    });

    new cdk.CfnOutput(this, "ServiceUrl", { value: service.attrServiceUrl });
  }
}
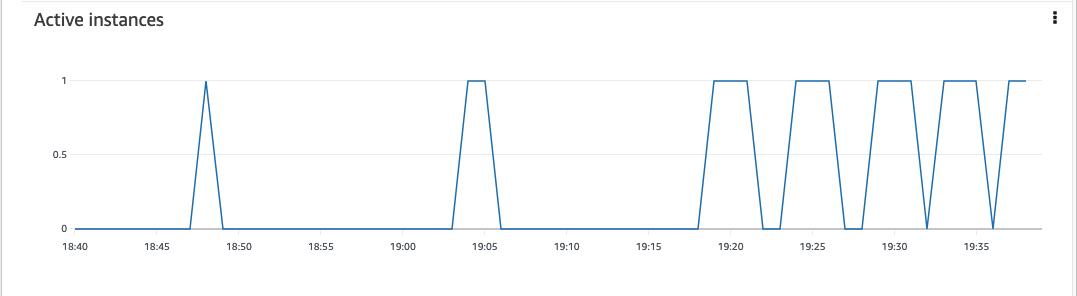
The lines 16-26 highlight that we want to throttle the service to 50 conccurent requests and to have a maximum of one active instance.
Let's deploy the stack and test it:
hey -c 200 -z 3m https://xxxxxxxxxx.region.awsapprunner.com/
It works! There is only one active instance when the service is highly requested:
Conclusion
Hosting a Next.js application with Docker in AWS is a great way to take advantage of the benefits of both technologies.
By containerizing the application and deploying it to App Runner, we can ensure that it is scalable, reliable, and easy to manage. With a little bit of configuration, we can have our application up and running in no time.
Source code available at https://github.com/benoitpaul/nextjs-hosting-docker-aws