Hosting a website on AWS
The cloud resume challenge is a great option to start learning the cloud.
I want to learn AWS, so I thought I'd give it a try and the experience has been a blast! This is the first article of a series that will delve into my learnings during this challenge.
The first step of the challenge is to create a simple resume in CSS and HTML, host it on S3, serve it via Cloudfront and finally provide a friendly URL with Route53.
While it's challenging enough for a first step, I opted to spice things up a bit :)
Here is my version:
- Build my whole website, including my resume
- Build the infrastructure as code with CDK
- Setup a simple pipeline for CI/CD
Getting started
It's considered best practice that infrastructure and runtime code live in the same package, so I created my repository with two folder:
- website
- infrastructure
I have a few requirements for my website:
- redirect all http to https
- the canonical domain is www, in a nutshell: redirect the non-www domain to the www domain.
- clean urls, no *.html extension. For example, the resume url is
https://www.benoitpaul.com/cv/, nothttps://www.benoitpaul.com/cv.html
Frontend: nextjs
Since I need a complete website and a blog, I'll create the website with Next.js.
For now a static website will do the trick. There's no official support for image optimization at build time, so I'll just need to it turn off
const nextConfig = {
  ...
  images: {
    unoptimized: true,
  },
};
Infrastructure as Code
To get started quickly, I first created an infrastructure with the AWS management console.
There are plenty of tutorials and YouTube videos about this, so that went well. I was able to host a simple html page in no time.
Next step, let's do it with code!
CDK
The simplest choice for me to create an infrastructure as code is to use the CDK. As a frontend developer I'm familiar with TypeScript, and it's a first class language for the CDK.
I created my own website CDK construct to abstract all the details.
There are a few things I learned along the way.
Domain and certificate
I had purchased my domain at Namecheap, so I created my Hosted Zone manually and copied the NS records in Namecheap.
Public buckets
My first version used private buckets and an origin access identity for Cloudfront to access the buckets, but that prevented to use the bucket as a website.
With the bucket website option turned off, I would have needed to forget the clean url, but really, who wants to use *.html extensions?
An option would be to upload the HTML files without an extension and make sure to set the content-type to text/html, but that's too hacky for me. AWS provides a website option for buckets, so let's use it!
All things considered, it's OK for my buckets to be public as there's no private information. If necessary, you can still use the website endpoint as the origin, with access restricted by a Referer header.
With that in place, the last thing I needed to get the clean url was to set the trailing slash option in NextJs
const nextConfig = {
  ...
  trailingSlash: true,
};
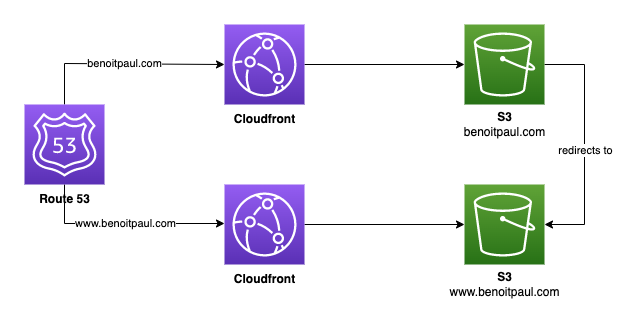
Redirecting non-www to www
To get the non-www redirecting to the canonical www domain, I had to create:
- two buckets
- two cloudfront distributions
- 2 sets of AA and AAAA records
The canonical bucket - www.benoitpaul.com is set as a website with the index set to index.html.
The naked domain bucket - benoitpaul.com is also set as a website, but with the redirect to www.benoitpaul.com
Then I set a cloudfront distribution for each bucket. Since the buckets are defined as websites, the CDK takes care of setting the cloudfront origin to the bucket website endpoint (instead of the REST endpoint)
Lastly, the AA and AAAA records are created for each cloudfront distribution
Here is a diagram of the website architecture:
Pipeline as Code
The pipeline is gonna be super simple. It will be will triggered when there is a code change in the main branch.
There are two constructs we can use to create a pipeline:
In the end, I could have built the pipeline with either construct, but I opted for aws-cdk-lib.pipelines.CodePipeline since the AWS describes it as an opiniated construct library, and to give it a try first.
I created a stack dedicated to the pipeline, and defined the the three steps that made it up.
Step 1: get the source code
Since my code is in GitHub, and I want to trigger the pipeline when there is a change to the main branch, I create a connection to my repo, manually in the AWS management console
Step 2: build the code
When I create the pipeline, I set the synth property to a new ShellStep, and define the build steps.
It's as simple as navigating into the website directory, building the Next.js app, then navigating to the infrastructure and building the CDK app.
Step 3: deploying to production
The last step is to deploy to production. I added a stage to the pipeline to deploy the stack that was synthetized.
Conclusion
At the end of this chunk of the challenge, I have a complete website hosted on AWS, available with my domain name.
The final resume is online!