How to regulate access to API Gateway with usage plans and API keys
Amazon Web Services (AWS) offers a powerful set of tools for developers, including the AWS API Gateway. This service allows developers to create, publish, maintain, monitor, and secure APIs at any scale.
One key feature of the AWS API Gateway is the usage plan, which allows developers to manage and control access to their APIs.
What are usage plans and API keys?
A usage plan defines the number of requests that a client can make to an API within a specified time period. This allows developers to ensure that their APIs can handle the desired level of traffic and avoid being overwhelmed by excessive requests.
Usage plans are important for APIs that are expected to receive a large amount of traffic, such as public APIs that are accessed by many different clients. By setting a usage plan, developers can ensure that their APIs can handle the expected level of traffic and provide a consistent experience to all users.
Once the usage plan has been created, developers can associate one or more API keys with the usage plan. These API keys can then be used by clients to access the APIs included in the usage plan.
For example, an API might provide a basic and premium tiers for the API.
The basic tier is free, but has more usage limits than the paid, premium tier.
Each tier is a usage plan. In this case, we'll need to define two usage plans: basic and premium.
In the following sections, we'll create an API and control its access with a usage plan.
Creating the API
Let's first create a simple REST API:
// create the API
const api = new apigateway.RestApi(this, "Api");
api.root.addResource("cats").addMethod(
    "GET",
    new MockIntegration({
        integrationResponses: [{
                statusCode: "200",
                responseTemplates: {
                    "application/json": `{
                    "id": "$context.requestId",
                    "result": "cats",
                }`,
            },
        }],
        passthroughBehavior: PassthroughBehavior.NEVER,
        requestTemplates: {
            "application/json": '{ "statusCode": 200 }',
        },
    }), {
        methodResponses: [{ statusCode: "200" }],
    }
);
This is a simple GET endpoint, implemented with a MockIntegration. It will return information about the request.
Let's deploy the API:
npx aws-cdk deploy
How to test API Gateway endpoints from the command line
You can test the API Gateway endpoint from the command line with curl, using this format:
curl https://[api-id].execute-api.[region].amazonaws.com/[stage]/
Let's give it a try:
➜ curl -X GET https://ggvj66elld.execute-api.us-east-1.amazonaws.com/prod/cats

{
    "id": "25b526cc-7fc2-4c20-9264-bbffb4e7f368",
    "result": "cats",
}
At this point we have a functionnal endpoint, but there is no control on who can access the endpoint and at which rate.
Creating the usage plan
We'll create two usage plans according to our example:
- A basic usage plan, free of use, but with more restrictions
- A premium usage plan, paid, more permissive
Basic usage plan
Let's start with the basic usage plan:
// Create the basic usage plan
const basicUsagePlan = api.addUsagePlan("BasicUsagePlan", {
    name: "Basic",
    throttle: {
        rateLimit: 1,
        burstLimit: 2,
    },
    quota: {
        limit: 5,
        period: apigateway.Period.DAY,
    },
});

basicUsagePlan.addApiStage({
    stage: api.deploymentStage,
});
When creating a usage plan, we can set the throttle and the quota properties.
- The throttle rate limit property defines how many requests per seconds are allowed.
- The throttle burst limit property defines how many concurrent requests the API can handle concurrently.
- The quota property defines how many times the API can be accessed for a period of time (hour, day or month).
In our example, the basic plan will allow 1 request per second, 2 concurrent requests and a maximum of 5 requests per day.
Premium usage plan
Similarly, let's create the premium usage plan.
// Create the premium usage plan
const premiumUsagePlan = api.addUsagePlan("PremiumUsagePlan", {
    name: "Premium",
    throttle: {
        rateLimit: 20,
        burstLimit: 5,
    },
    quota: {
        limit: 100000,
        period: apigateway.Period.DAY,
    },
});

premiumUsagePlan.addApiStage({
    stage: api.deploymentStage,
});
The premium usage plan is much more permissive than the basic usage plan with 20 request per second, 5 conccurent requests and a maximum of 100,000 requests per day. This is the usage plan we plan to monetize :)
Requiring an API key
At this point, just creating and adding usage plans to the API is not enough, as the console is warning us:
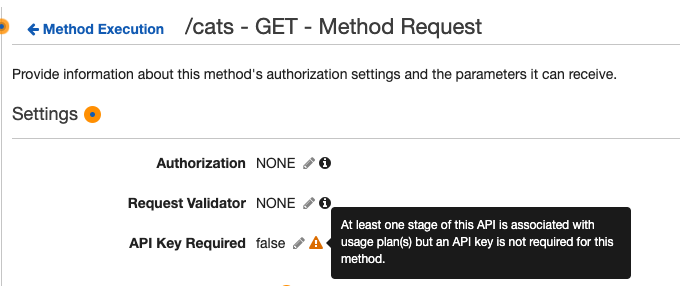
We need to require an API key on the method:
// create the API
const api = new apigateway.RestApi(this, "Api");
api.root.addResource("cats").addMethod(
    "GET",
    new MockIntegration({
        integrationResponses: [{
                statusCode: "200",
                responseTemplates: {
                    "application/json": `{
                    "id": "$context.requestId",
                    "result": "cats",
                }`,
            },
        }],
        passthroughBehavior: PassthroughBehavior.NEVER,
        requestTemplates: {
            "application/json": '{ "statusCode": 200 }',
        },
    }), {
        apiKeyRequired: true,
        methodResponses: [{ statusCode: "200" }],
    }
);
If we test the API, with get a different result:
➜ curl -X GET https://ggvj66elld.execute-api.us-east-1.amazonaws.com/prod/cats

{ "message":"Forbidden" }
Since we're requiring an API key on the method, but we're not providing any, we're getting a forbidden response.
Adding an API key
In order to make use of the usage plan, we need to create an API key.
Let's create an API key for each usage plan:
const basicApikey = api.addApiKey("BasicApiKey");
basicUsagePlan.addApiKey(basicApikey);

const premiumApikey = api.addApiKey("PremiumApiKey");
premiumUsagePlan.addApiKey(premiumApikey);
This will generate 2 API keys:
- basic:
NtjczMY1tL2dergMBN5yYamdC0lw9CkN70uTGSYj - premium:
p58BTHm4P73HjK1ntyq2KawTXEVLqvWd9AWvKrCh
How to pass the API Key to the request
You can pass the API key to the request with the x-api-key request header.
Let's give it a try with basic API key:
➜ curl -X GET -H "x-api-key: NtjczMY1tL2dergMBN5yYamdC0lw9CkN70uTGSYj" https://ggvj66elld.execute-api.us-east-1.amazonaws.com/prod/cats

{
    "id": "2baa2087-31a1-40d5-bf62-e37e669673ed",
    "result": "cats",
}
If we try it a few more times, we get a Limit Exceeded response.
This is because we set a quota of 5 invocations per day for the basic usage plan.
➜ curl -X GET -H "x-api-key: NtjczMY1tL2dergMBN5yYamdC0lw9CkN70uTGSYj" https://ggvj66elld.execute-api.us-east-1.amazonaws.com/prod/cats

{ "message":"Limit Exceeded" }
We don't have such a limitation with the premium usage plan:
➜ curl -X GET -H "x-api-key: p58BTHm4P73HjK1ntyq2KawTXEVLqvWd9AWvKrCh" https://ggvj66elld.execute-api.us-east-1.amazonaws.com/prod/cats

{
    "id": "aed5cf40-df1c-4f60-8442-47162d6ab445",
    "result": "cats",
}
Throttle limits at method the method level
The throttle settings we've set up so far are defined at the API level. You can also define throttle settings at the method level.
const dogsMethod = api.root.addResource("dogs").addMethod(
    "GET",
    new MockIntegration({
        integrationResponses: [{
            statusCode: "200",
            responseTemplates: {
                "application/json": `{
                "id": "$context.requestId",
                "result": "dogs",
            }`,
            },
        }],
        passthroughBehavior: PassthroughBehavior.NEVER,
        requestTemplates: {
            "application/json": '{ "statusCode": 200 }',
        },
    }), {
        apiKeyRequired: true,
        methodResponses: [{ statusCode: "200" }],
    }
);

// Create the basic usage plan
const basicUsagePlan = api.addUsagePlan("BasicUsagePlan", {
    name: "Basic",
    throttle: {
        rateLimit: 1,
        burstLimit: 2,
    },
    quota: {
        limit: 5,
        period: apigateway.Period.DAY,
    },
});

basicUsagePlan.addApiStage({
    stage: api.deploymentStage,
    // use a different throttle setting for the GET /dogs method
    throttle: [{
        method: dogsMethod,
        throttle: {
            rateLimit: 10,
            burstLimit: 5,
        },
    }],
});
In this example, we create another GET method (for the dogs resource). While the basic usage plan defines the same throttle settings as before:
throttle: {
    rateLimit: 1,
    burstLimit: 2,
}
The GET /dogs method specifically will have this throttle settings with the basic usage plan:
 throttle: {
    rateLimit: 10,
    burstLimit: 5,
}
In conclusion, usage plans are an important feature of the AWS API Gateway that allow developers to control access to their APIs and ensure that they can handle the expected level of traffic.
By setting a usage plan, developers can provide a consistent experience to all users and protect their APIs from unauthorized access.
Code for this article is available here: https://github.com/benoitpaul/aws-labs/tree/main/api-gateway-usage-plan